Monday, December 27, 2010

Happy Holidays!

I hope everyone had a wonderful Christmas with lots of yummy, and healthier food! ;] I am not going to post this week. I have a family reunion, birthdays, and parties on top of all of that.
I hope you have a very
Happy New Year!
We'll see you next year, oh I mean next week!
Happy Healthier Eating!!!
*If you tried any new recipes, I would love to hear about them.
**If you ate something over the holidays that was sinfully delicious, I would love the recipe.

Friday, December 24, 2010

Fun Food Find Friday!!

Merry Christmas Eve!!
Since today is Christmas Eve, I thought I would share with you a tradition we have in our family. My Grandma loved this drink. I have no idea if she thought it up or not, but she was the first one to introduce it to us. We only had it during Thanksgiving and especially Christmas. When she passed away the next Christmas we were all sitting around as a family talking about her and this drink. Someone, I'm not sure who, said we should call them Jeanie Teanie's after our Grandma who's name was Jean. We have called them that ever since.
Jeanie Teanie's

Ingredients
Fresca
Cranberry Juice

Directions
You can mix it anyway you like. Most like it about 60% juice to 40% fresca. For myself and my children I do more of a 80% to 20% or 90% to 10%. That way you get more flavor with just a little bit of the soda. :] Experiment with it and see how you and your family like it the best. Also you can get different types of Cranberry Juice. In the picture it is a mix of apples and cranberries. I really like the all fruit juice one that has raspberries and cranberries. The possibilities are endless.
Happy Holidays!!!

Thursday, December 23, 2010

Chocolate (Carob) Peanut Butter Cup Cookies

If you have any of your Peanut Butter cups left over this is a great way to use them. My kids love these. They also make a great gift or nice little treat to take to one of your holiday parties.
Chocolate (Carob) Peanut Butter Cup Cookies
Ingredients
3 eggs
1 cup evaporated cane juice
1/2 cup organic brown sugar
1/4 cup coconut oil, solid form
3/4 teaspoon salt
4 teaspoons baking powder
1 teaspoon baking soda
1 teaspoon xanthan gum
2 teaspoon vanilla extract
3 1/2 to 4 cups LG flour mix
Homemade Carob peanut butter cups
Some carob chips just in case
Directions
Preheat oven to 375*F. Cream eggs, evaporated cane juice, brown sugar, and coconut oil. Then add salt, baking powder and soda, vanilla and 3 cups of flour. Stir in the rest of the flour adding a little at a time. The dough should still be wet but not sticky. Spray a small sized muffin tin with non stick cooking spray. Fill each hole 3/4 of the way full. Bake for 10 - 11 minutes. Remove from oven and push in the carob peanut butter cups before removing from pan. Let cool and enjoy! If you have some dough left over add some carob chips and bake them as carob chip cookies. Remember to let the dough cool in the fridge before baking them as cookies.

Wednesday, December 22, 2010

Chocolate (Carob) Cereal Snack Mix

Sorry about the picture, I know it's awful!
During the holidays my younger sister likes to make what she calls, Muddy Buddies. They always have looked so good but oh so fattening and made with all of the things I can't have. So when I came across this recipe, that is similar to the one she uses, I just had to try it. They are so yummy! This is another treat that you can make and take over the Holidays and not feel as guilty eating them. It's also double nice that they are so easy to make. :]
Chocolate (Carob) Cereal Snack Mix
Ingredients
3 cups rice chex type cereal, I use the Health Valley brand they only have 4 ingredients
1/2 cup carob chips
2 tablespoons organic peanut butter
1/2 cup organic powdered sugar
1/8 teaspoon vanilla extract
1 gallon sized zip lock bag.
Directions
Melt carob in double broiler on stove top using medium to low heat. Once carob chips are melted add peanut butter and vanilla. Put cereal in medium sized bowl and pour carob mixture over top. Stir until cereal is completely covered. Add powdered sugar to zip lock bag. Pour carob covered cereal into bag. Zip closed and shake until cereal is covered with powdered sugar. Store in an airtight container, and enjoy!

Tuesday, December 21, 2010

Chocolate (Carob) Peanut Butter Cups

I've made these a few times. This time I decided to actually write down how I was changing this recipe. It was also more fun making them this time because I went and purchased some small Peanut Butter cup molds from Fun Finity. They are so cute and perfect for another project I'm working on, post to come later. These are so delicious it will be hard to control your self and not eat all of them at once. I have to hide them from my children. They are a great little treat for this weekend, and they are a little more healthy than the store bought ones. :]
Chocolate (Carob) Peanut Butter Cups
Ingredients
3/4 cup Carob chips
1/8 teaspoon coconut oil
1/4 cup organic peanut butter
1 pinch salt
2 tablespoons organic powered sugar
1/8 teaspoon vanilla extract
Directions
Spray molds, or small muffin tin, with non stick cooking spray. Put 1 to 2 inches of water in a small pan, or bottom of your double broiler and cook on stove top on medium to low heat. In a metal bowl, or top of your double broiler, put the carob chips and coconut oil. Stir until completely melted. Spoon (or I like to use my clean finger) melted carob into molds, filling 1/4 of the way full. Using your spoon draw the carob up the sides of the molds until evenly coated. Place in freezer.
In the meantime: In a small bowl, combine peanut butter, salt, powered sugar, and vanilla. Place your bowl back on top of your pan or double broiler to keep carob melted.
Remove molds from freezer. Fill them with the peanut butter mixture, almost filling to the top. Stir melted carob, and spoon enough to cover each cup. When finished use a damp finger to smooth out the top of the cup. Then place in the freezer for a few minutes until completely set.
When set pop out of molds and enjoy!
*Makes about 28 small cups from the molds. Double recipe if using small muffin tins.

Monday, December 20, 2010

Sugar Cookies

My neighbor asked me for my recipe, really it's my mom's with some of my changes, for some sugar cookies that we had taken her. I told her it was on my blog. When I double checked I couldn't believe that it wasn't there! We make these several times through out the year. Our biggest times are Valentine's Day and Christmas.
These really are the best, and most healthy, sugar cookies you'll ever taste. They are perfectly chewy, soft, and moist, with a little extra hint of flavor from the spices. I am constantly getting compliments on them. Even if these in this picture don't look the best, not my finest hour in decorating, they do taste wonderful!
Sugar Cookies
Ingredients
3 1/4 cup whole wheat flour
1 1/4 cup evaporated cane juice
1/2 teaspoon salt
1/2 cup coconut oil, solid form
1 1/4 teaspoon baking powder
1/2 teaspoon baking soda
2 eggs
1/2 cup sour cream
1 tablespoon vanilla extract
3/4 teaspoon ground cinnamon
1/2 teaspoon ground cloves
1/2 teaspoon ground nutmeg
Directions
Preheat oven to 400*F. Cream together coconut oil and evaporated cane juice. Then add flour, salt, baking powder and soda. Mix in remaining ingredients until soft dough forms. Add more flour if necessary. Roll our on floured surface to 1/4" thick. Cut in desired shapes. bake for 8 minutes. These cookies do not need to brown to be done. Cool on cooling racks. Then frost and enjoy!

Friday, December 17, 2010

Fun Food Find Friday!!


Our Fun Food Find for today are the candy canes I was telling you about, Pure Fun Organic Candy Canes. These are so delicious!! They are made with evaporated cane juice and brown rice syrup, so much much MUCH better than regular candy canes. My kids just love these.
There is one problem with these, I couldn't find them anywhere local. Non of Health food stores ordered them this year. But I did find them on line for a cheaper price. Go here to order them. They also have some other organic candies that I ordered that I'm going to try. Just remember to check the ingredients before you order. Some of their stuff says organic and then it is made with refined sugar. If you order them today have them shipped in three days to get here by Christmas, good luck! Merry Christmas!!

Thursday, December 16, 2010

Turkey Balls in Honey Garlic Sauce

At this time of year there are a lot of parties to go to. It's nice to be able to take something yummy that doesn't pack on the bad, empty calories. I loved these turkey balls! They have a nice hardy flavor, like a meat ball should have, with just a hint of sweetness to them. I took them to a party where the only food there was appetizers. They don't take that long to make and are very delicious. Very good to eat on rice too.
Turkey Balls in Honey Garlic Sauce
Ingredients
Balls:
1 egg
1 teaspoon garlic, minced
1 tablespoon bragg's liquid aminos
1 tablespoon Worcestershire sauce
3/4 teaspoon ground cumin
1/4 teaspoon mustard powder
1/4 teaspoon chili powder
3/4 cup smashed crackers, I use gluten free multigrain
1/2 pound ground turkey
Sauce:
1 tablespoon butter
1/2 teaspoon garlic, minced
1 small onion, minced
1/2 cup honey
1 can dice tomatoes, pureed
1/2 tablespoon liquid smoke
1 teaspoon white vinegar
1 1/2 tablespoons kamut flour, or gluten free flour mix
1/2 teaspoon onion salt
1/4 teaspoon garlic powder
Directions
Balls:
Preheat oven to 400*F. Line a cookie sheet with parchment paper. In a bowl combine egg, garlic, bragg's, Worcestershire sauce, cumin, chili and mustard powders, and half of the crackers. Then add ground turkey and combine well. Slowly add the rest of the crackers a little bit at a time. You want these turkey balls to stick together but to be a little on the dry side. That way they will absorb more of the sauce. Form turkey into small bite size balls and place on the cookie sheet. Bake in oven for 15 minutes or until cooked through. Makes about 30 small balls.
Sauce:
While the turkey balls are baking, in a medium sauce pan, saute garlic and onion in butter until onion is translucent. Then add pureed tomatoes, liquid smoke, honey, and white vinegar. Bring to a simmer. In a separate bowl combine kamut flour, onion salt, and garlic powder. Add flour mixture to sauce. When the turkey balls are cooked through add to sauce. Simmer until sauce thickens. Serve warm with toothpick, or serve on cooked rice and enjoy!

Wednesday, December 15, 2010

Homemade Hot Cocoa Mix

I know it's Wednesday and I usually post some wisdom about food or health, but Christmas is coming so quickly and I wanted to share with you what I'm doing for my neighbors for Christmas.
I am going to give them some of this homemade cocoa mix along with some homemade peppermint, pumpkin, and vanilla marshmallows. I'm so excited about it!
Okay so now to tell you about this mix. Really it is so easy and yet so delicious too! I found that you really don't need all of the extras that some recipes call for. Simple is the best, at least that is what I've found. Try it, you'll love it!
Homemade Hot Cocoa Mix
Ingredients
1 cup unsweetened cocoa powder, or carob powder
3/4 cup evaporated cane juice
Directions
Mix all ingredients in a bowl. Heat up rice milk. Add 2 to 3 tablespoon of mix to hot rice milk. Add your favorite marshmallows and enjoy!

Tuesday, December 14, 2010

Homemade Peppermint Marshmallows

This has taken me a little longer than I thought it would, but here is the second part of my neighborhood gift I was telling you about last week. These peppermint marshmallows turned out just delicious! I love them! My kids love them! If you love or even like to put candy canes in your hot cocoa, you will love love LOVE these marshmallows! They make your hot cocoa creamy with the taste of peppermint. Make them, you'll love them!
Homemade Peppermint Marshmallows
Ingredients
3 1/2 envelopes unflavored gelatin (2 tablespoons plus 2 1/2 teaspoons)
1 cup cold water, divided
1 3/4 cup evaporated cane juice
1/2 cup agave
1/4 teaspoon salt
2 large egg white
1 1/2 - 2 tablespoons peppermint extract (depending on how pepperminty you want them)
3 drops red food coloring
2 cups organic powdered sugar
3 organic candy canes, crushed
Directions
Grease bottom and sides of a 13x9 inch rectangular metal pan, and dust bottom and side with organic powdered sugar.
In a bowl of a standing electric mixer sprinkle gelatin over 1/2 cup cold water, and let stand to soften.
Meanwhile, in a 3-quart heavy sauce pan cook evaporated cane juice, agave, second 1/2 cup cold water, and salt over low heat. Stir with a wooden spoon until cane juice is dissolved. Cover and increase heat to moderate high and boil. Once the mixture starts to boil uncover and insert candy or digital thermometer. Boil until the thermometer register 240*F (soft ball stage). Remove pan from heat and pour lot liquid mixture over gelatin mixture. Stir until gelatin is dissolved. Turn on electric mixer to high speed and mix until mixture turns whit, thick, and nearly triples in volume, about 6 minutes.
While that thickens, in a separate bowl with cleaned beaters beat eggs whites until they just hold stiff peaks. Beat egg whites, peppermint, and food coloring into white mixture until just combined. Pour, now pink, mixture into baking pan. Sift some of the powdered sugar evenly over the top. Chill, uncovered, until firm, at least three hours, and up to one day.
When firm, run a thin knife or rubber scraper, around edges of pan and invert pan onto a large cutting board. Lifting up one corner of inverted pan, with rubber scraper, loosen marshmallow and ease onto cutting board. With a large knife rim edges of marshmallow and cut marshmallow into one-inch cubes. Sift remaining organic powdered sugar back into our now-empty baking pan along with the crushed organic candy canes, and roll the marshmallow though it to prevent sticking. Store in a plastic bag in fridge or in freezer for up to one month, and enjoy!
To make small marshmallows like I did, use two 9x13 inch pans and divide pink mixture between the two pans. This allows you to cut them a little smaller for small marshmallows.

Monday, December 13, 2010

Pumpkin Cream Cheese Spread

This is the recipe that I talked about last Thursday to go on the 2 layer pumpkin cake. It is very yummy, I received lots of compliments on it. It isn't a stiff frosting. I just let is fall down the side of the cake. Hope you like it!
Pumpkin Cream Cheese Spread
Ingredients
1 8oz package 1/3 less fat cream cheese
1/2 cup canned pumpkin
1/2 cup evaporated cane juice
1/2 teaspoon vanilla
1/2 teaspoon ground cinnamon
1/2 teaspoon ground nutmeg
1/4 teaspoon ground ginger
Directions
Beat all ingredients in a medium mixing bowl with an electric mixer on medium speed until smooth. Cover and refrigerate for about an hour, then spread on cake or use for cookies dip.

Friday, December 10, 2010

Fun Food Find Friday!!

I've been looking all over the place for the organic candy canes that I usually buy for Christmas. No one seems to have them this year. If you see any would you please let me know where they are. In the mean time I'll keep looking and let you know when I find them. They are so good and made with evaporated cane juice!

Thursday, December 9, 2010

2 Layer Pumpkin Cake

Here is yet another yummy but more healthy cake for your pleasure. :] It's pumpkin and goes so well with the season. It turned out so yummy and moist. A lovely treat to take to those Christmas parties that are coming up.
2 Layer Pumpkin Cake
Ingredients
1 cup evaporated cane juice
1/2 cup coconut oil, liquid, or vegetable oil
2 eggs
1 1/4 cup kamut flour
1 1/2 teaspoon baking soda
1 teaspoon ground cinnamon
1/4 teaspoon ground ginger
2 1/2 teaspoon baking powder
1/4 teaspoon salt
1/4 teaspoon xantham gum
1 cup pumpkin puree
Directions
Preheat oven to 350*F. Combing evaporated cane juice, oil, and eggs in a large mixing bowl; mix well. Sift dry ingredients into a separate bowl; stir into oil mixture, beating well. Stir in pumpkin puree. Pour batter into 9 inch round, greased, cake pans. Bake for 35-40 minutes or until cake tests done when toothpick inserted in the center comes out clean. Cool on racks. Frost with Pumpkin Cream Cheese Spread.
Original recipe found here.

Tuesday, December 7, 2010

Butternut Squash Soup

If you have been following my blog you know by now how much I love butternut squash. I have experimented with several different soup recipes. Not one of them has turned out. I don't know what it is. I have even tried to follow the directions and the ingredients of recipes exactly. But not one of the butternut squash soup recipes could I even stand to give to my children let alone share it with you! Well today we have a winner. This soup is extremely smooth and creamy. I had no idea how well beef broth could be with butternut squash. It really is tasty. Now it's not my favorite way to eat butternut squash, but it was good, and extremely simple. When you see what is in it you will want to try just to see for yourself. Well at least that is why I decided to try it anyways. :] Hope you like it, and happy eating!


Butter Squash Soup


Ingredients
1 small butternut squash
1 can reduced fat beef broth
salt to taste

Directions
Preheat oven to 400*F. Cut squash in half and remove seeds. Place on a parchment lined cookie sheet inside down. Bake until a fork and be inserted in squash easily, about 20-30 minutes. Remove squash from the oven and scoop out the insides with a spoon (you will need 2 1/2 cups of squash for every 1 can of broth). Place in a pot on stove top and add the broth. Use a hand mixer, or transfer soup to a blender to puree smooth. Cook until heated through, and enjoy!

Yep that's it, it's that simple!!
original recipe found here.

Monday, December 6, 2010

Pumpkin Marshmallows

I'm sorry about dropping off the face of the earth last week. To be honest I haven't been cooking and experimenting very much lately. Mostly last minute shopping and getting ready for Christmas. I'll try and do a little better. :]
When I found this recipe for pumpkin marshmallows I was so excited to try them. How good could they be, I thought. Well let me tell you... they are so amazing!!! I love them, and so do my kids and anyone who I let try them. I've decided that they are going to be part of my neighborhood Christmas gift this year. I'll tell you more about that hopefully by the end of this week or the beginning of next. Any who, these are sooo good and if you like to add chocolate chips to your pumpkin bread you will like these in your cup of hot chocolate or hot carob!
Pumpkin Marshmallows
Ingredients
3 envelopes unflavored gelatin
1/2 cup cold water
2 cups evaporated cane juice
2/3 cup agave
1/4 cup water
1/2 cup pumpkin puree
1 heaping teaspoon ground cinnamon
1 level teaspoon ground ginger
1/4 heaping teaspoon ground nutmeg
1/4 teaspoon salt
1/4 cup organic powdered sugar
Directions
Spray a 9x13 inch pan with non stick cooking spray and dust with organic powdered sugar. Set aside.
Pour the 1/2 cup cold water into the bowl of a stand mixer and sprinkle the gelatin on top. Set aside for 10 minutes. Combine the evaporated cane juice, agave, and 1/4 water in a sauce pan; cover. Bring to a boil over medium-high heat. Take the lid off when it starts to boil and add a candy thermometer. Heat to 250* F, or until a small amount of the syrup dropped into a cold a bowl of cold water forms a rigid ball.
Meanwhile, combine the pumpkin puree, cinnamon, ginger and nutmeg, mix well.
When the syrup is finished add to the dissolved gelatin and turn on your mixer on slow speed. Increase the speed to medium-high and add the salt. Mix until stiff, shiny, white in color, and tripled in size, about 5-12 minutes. Scrape down the sides of the bowl occasionally using a rubber spatula.
When tripled in size remove the bowl from the mixer and fold in the pumpkin mixture until combined. Return the bowl to the mixer and beat on medium-high speed about 3 minute longer. The mixture should form a more-or-less continuous ribbon off the spatula into the bowl.
Pour the mixture into the prepared pan so that it is an even depth. Top with a light coat of organic powered sugar. Let the mixture set at room temperature for at least 8 hours or over night.
When the marshmallows have set, turn them onto a work surface and cut them into squares or shapes as desired. Roll each marshmallow in organic powdered sugar to coat each side to prevent sticking. Store in an airtight container in fridge or freezer. They can last for up to a month in the freezer or a week on the counter. Enjoy!

Wednesday, December 1, 2010

Widsom Wednesday!!

Fruit and Vegetables
Did you hear about Weight Watchers and the changes they've made to their point system? If you haven't I thought I would share part of it with you today. To be honest I don't know a ton about their point system. I know it works for a lot of people. I have an aunt that lost a lot of weight on their program. She told me one time that one M&M was one point. You only get so many points a day. With their new program they have taken away points from fruits and vegetables. I'm thrilled to hear this because they are extremely healthy for you and I don't think that they should have had any points to begin with. Yes they do have calories, but they are good calories. Calories that help your body with energy, with detoxing, with vitamins and minerals. Your body can't get enough fresh fruits and vegetables. So if you're on weight watchers dive in, eat as many fruits and vegetables as you want. If you're not on the program dive in anyways!! And remember Happier Healthier Eating!!
To see an article about the changes go here.

Tuesday, November 30, 2010

Mixed Berry topped Cake

I've been making a lot of desserts lately. And here I go with cakes again, I can't help myself, cakes are so fun to make and experiment with! This picture makes the cake look like it's really runny and way too moist. It really isn't. I promise! I made one of these once to take to my neighbors and I put the berries on their and mine at the same time. I took theirs over to them. Then I came home, made dinner, ate and cleaned up dinner, and then we had the cake and it wasn't gooey inside at all. Just enough of the sweet juices from the berries had fallen into the cake. This really is one of my more healthy and still very delicious cakes, I hope you enjoy all of it's guilt free goodness!
Mixed Berry topped Cake
Ingredients
2 cups whole wheat flour
1 tablespoon baking powder
1 teaspoon salt
1 1/2 cups evaporated cane juice
2 eggs
1 teaspoon vanilla extract
3/4 cup rice milk
3/4 cup applesauce
2 cups frozen mixed berries, thawed
2 tablespoons evaporated cane juice
Directions
Preheat oven to 350*F. In a small bowl combine the mixed berries with 2 tablespoons evaporated cane juice let sit on counter until ready to use. In a bowl combine flour, baking powder, salt, and evaporated cane juice. Then add the eggs, vanilla, rice milk, applesauce, and combine well. Pour into a parchment lined, and sprayed with non stick cooking spray, 9 inch cake pan. Bake for 30-40 minutes or until a toothpick inserted in the center comes out clean. Let cool slightly. Then remove cake from pan and remove parchment paper. When cooled completely, spoon mixed berries over cake, serve, and enjoy!

Monday, November 29, 2010

Mini Ginger Cookies

I hope everyone had a wonderful Thanksgiving holiday. Mine was fun, busy, tasty, and also tiring. :] I just love being with family!
I saw these cookies demoed on Studio 5. They looked so yummy! I like the flavor of ginger cookies but I don't like how hard they are. These cookies are very moist, chewy, and simply delicious. I've made lots already and given lots away too. :] They are very addicting and good for you. Did you know that Molasses has lots of natural iron in it? It does, so with my modifications you don't have to feel bad one bit about eating more than one of these.
Mini Ginger Cookies
Ingredients
1/2 cup coconut oil
1 1/2 cup evaporated cane juice
1/4 cup full flavor molasses
2 eggs
3 cups spelt flour
1/4 teaspoon salt
2 teaspoons baking soda
1 teaspoon ground ginger
1 1/2 teaspoons ground cinnamon
1 teaspoon ground cloves
Directions
Preheat oven to 350*F. Melt coconut oil so it becomes a liquid. Add evaporated cane juice, molasses, and egg. Beat well. Sift together flour, baking soda, and spices. Add to fist mixture. Mix well; chill. Form into 1/2" balls. Roll balls in some evaporated cane juice and place on a greased cookie sheet. Flatten with the bottom of a glass. Bake for 8-10 minutes. DO NOT OVER BAKE! If you do then you will get hard cookies. Cool and enjoy!

Friday, November 19, 2010

Fun Food Find Friday!!

Our Fun Food Find for today are the graham cracker crumbs I used when making the pie crust I posted yesterday, Gluten Free Graham Style Crumbs. There are so delicious! They don't taste like they are gluten free and easy to work with. Try them you'll love them!
You can buy these on line or at the health food stores.

Thursday, November 18, 2010

Healthier Graham Cracker Crust

Thanksgiving is next week!! I can't believe how fast this month as gone by. I wanted to share with you this pie crust. Even though it is made from graham crackers it is a very yummy crust and would be great with pumpkin or any other pie because you bake it. It really isn't like the normal graham cracker crust you make for pudding pies. It's easy to make gluten free and fat free, minus the fat from the crackers of course. :] Try it you'll be pleasantly surprised!
Healthier Graham Cracker Crust
Ingredients
2 cups gluten free graham cracker crumbs
3 1/2 tablespoons nonfat vanilla yogurt
1 1/2 tablespoons organic brown sugar
Directions
Preheat oven to 350*F. Spray a 9 inch pie pan with non stick cooking spray. In a medium bowl, mix together graham cracker crumbs, yogurt, and organic brown sugar. Wet your hands and press mixture firmly into the pie pan. Bake in preheated oven for 15 minutes or until crust sets up firm in center. Cool and add your favorite pie filling.

Wednesday, November 17, 2010

Wisdom Wednesday!!

Today for our Wisdom Wednesday I wanted to talk about something I had never thought about before. It all started when my daughter came home from preschool with a very unusual homework assignment. One day she was to go though our kitchen and see if she could name all of the vegetables. The next day the assignment was to do the same with the fruits. At first I thought it was a ridiculous assignment. Of course my children know what fruits and vegetables are and can name them (well she did think the grapefruit was an orange :]). We eat them all of the time. I even try to get different ones that I've never heard of and we all try them. But then I realized that most families are not like mine. Most families have not been through the health problems that we have been through so their eating habits are not the same. Now I'm not saying that people are bad if they don't eat as many fruits and vegetables as I do, or even as many as my children do. But it did get me thinking, "Do I talk to my children about the importance of fruits and veggies?" I don't think I do. I think it's important that they know why they should be eating them. How eating them can help us be stronger and more healthy. So today I am posing two questions, "What and/or how do you tell your children about the importance of eating fruits and vegetables? and Do your children know the names of the fruits and vegetables they are eating?" I hope this helps you to think as much as did for me. Happy Healthier Eating!

Tuesday, November 16, 2010

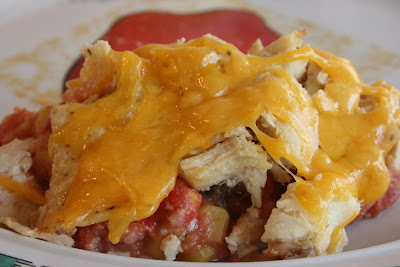
Nacho Turkey Casserole

At the beginning of last month my uncle and aunt had Canadian Thanksgiving. My aunt is from Canada so we celebrate it every year. It's great to get two Thanksgivings in one year. They had left overs for the first time in I don't know how long, so I took some home. I came across this recipe. I was so excited because I already had some cooked turkey in the fridge. It was very easy and extremely delicious. The only thing I would warn or change is the salsa. The first time I made this I used salsa that was a little too hot for my children. When I made it with chicken I cooked it before adding it and it was great too. I'm excited to make this again with turkey with the leftovers from Thanksgiving next week!
Nacho Turkey Casserole
Ingredients
5 cups slightly crushed tortilla chips
4 cups cube cooked turkey or chicken*
2 cups salsa
1/4 cup light sour cream
2 tablespoons barley flour
1 cup shredded mozzarella or Cheddar cheese
2 medium tomatoes diced
Directions
Preheat oven to 350* F. Lightly grease a 13x9x2 inch baking dish. Place 3 cups of the tortillas chips on the bottom of the dish. In a large bowl combine salsa, sour cream, flour, turkey, and diced tomatoes. Spoon over tortilla chips. Bake, uncovered, for 25 minutes. Remove from oven, sprinkle with the remaining 2 cups tortilla chips and cheese. Bake, uncovered, for 5 to 10 minutes more or until heated through. Serve and enjoy!
*if you want to do it with chicken, I cooked 2 boneless skinless chicken breast in chicken broth until cooked through. Then cubed it and add it when you are to add the turkey.

Monday, November 15, 2010

Gnocchi with Primavara Sauce

I've been wanting to find some different recipes. I came across this one. This might sound a little crazy but I didn't know that Gnocchi noodles were made out of mashed potatoes. To be honest this recipe took several, several, several tries to get it right. There are a few different recipes on line, and lot of opinions on how to make it the best way. It was a little difficult to get it right. So bare with me while I go through the directions. I want to be able to tell you exactly what I learned so you don't have to go though the same trial and error that I had to go through. The end product is nice and wonderful. It was just divine with the tomato sauce. And it's very inexpensive to make because it is mostly mashed potatoes!
Gnocchi with Primavara Sauce
Ingredients
6 potatoes
2 cups barley flour
4 eggs
4 teaspoons onion salt
2 teaspoons garlic powder
You will also need:
large zip lock bags
scissors
Directions
Bring a large pot of salted water to a boil. Boil potatoes until soft enough to be able to mash them. Peel skins off and them mash them, do not let them sit in the water. The more water they absorb the harder it will be to get the right consistency. Put 1 cup of packed mashed potatoes and 1 egg into a mixer. Mix on med high until very smooth and creamy, scraping sides as it mixes. Add 1 teaspoon of onion salt and 1/2 teaspoon garlic powder and mix until well combined. Add 1/2 cup barley four. Mix until potato mixture can be formed into a ball. Remove ball and repeat this process 3 more times.
Bring a large pot of lightly slated water to a boil. Place one of the potato balls into a large zip lock bag. Cut a medium size, about 3/4 inch, hole out of one of the corners of the bag. Start squeezing the potato mixture out of the bag over the boiling water. As the string of potato mixture comes out of the bag use scissors to cut it every inch or so, depending on how big you want your gnocchi to turn out. Be careful not to squeeze the bag too hard, the steam from the water will soften your bag and it can break easily. The gnocchi are finished when they raise to the top. This happens very quickly, 2 to 3 minutes. Do not over cook or they become too sticky from the starch of the potatoes. Remove with a slotted spoon and place in a colander to drain. Repeat this with the remaining three balls. I needed to use a different baggie for each ball. Top with Primavara sauce and Parmesan cheese.
Primavara Sauce
Ingredients
1/2 medium onion, chopped
2 cloves garlic, minced
2 tablespoons butter
2 cans diced tomatoes with garlic and onion, undrained
2 teaspoons evaporated cane juice
1/8 teaspoon salt
bash black pepper
3 to 4 tablespoon dried basil leaves
1/4 cup Parmesan cheese
Directions
In a medium sauce pan cook onion and garlic in butter until onion is tender. Carefully stir in the diced tomatoes, evaporated cane juice, salt, and pepper. Bring to a boil then reduce heat. Add dried basil and Parmesan cheese. Simmer, uncovered, for 10 minutes or until desired consistency, stirring occasionally. Pour sauce over Gnocchi noodles and top with Parmesan cheese. Enjoy!

Friday, November 12, 2010

Fun Food Find Friday!!

This is a new find for me. It is a granola by Nature's Path called Ancient Grains. The flavor is amazing and the nutrition even better. It has quinoa which I've talked about before how it is a complete protein on it's own. It also had Amaranth, which I didn't know is also a complete protein. Those make this granola very filling. I can have a little in the morning and I'm not hungry for hours! It also has Spelt and Kamut, so a little bit of gluten but great for the gluten intolerant and tons of vitamins and minerals. My kids love it just as much as I do, so I have to hide it from them. :]
I found this one at Costco, but they do carry it at the health food stores.

Thursday, November 11, 2010

Crock pot Chicken Cacciatore

I have had so much fun getting back into the kitchen! It feels like it's been forever since I've done any real cooking. I'm feeling better now and I can't wait to share with you the fun things I been making.
When I was recovering my wonderful sister-in-law brought over some Chicken Cacciatore. It looked and smelled so delicious, and it tasted even better. I had never heard of chicken cacciatore before. She was shocked, probably because my husband is part Italian. Besides the yummy taste I love how you can add more and more vegetables to this dish and it only makes it better.
I had been craving it ever since then so when I saw this recipe to make it in the crock pot, I was ecstatic! When you don't quite have your energy back the crock pot is the way to cook dinner. :] It is very easy and just as delicious as the oven version but more healthy and gluten free. Hope you enjoy!
Crock Pot Chicken Cacciatore
Ingredients
3 boneless skinless chicken breasts, cut into small cubes
2 medium onions, diced
2 teaspoons minced garlic
1/2 teaspoon dried oregano leaves
1/4 teaspoon dried basil leaves
1 teaspoon dried parsley leaves
1/2 teaspoon salt
2 14oz cans diced tomatoes with garlic and onion, undrained
1 6oz can tomato paste
1 medium green bell pepper, sliced
1 medium yellow squash, sliced
1 medium zucchini, sliced
Grated Parmesan cheese
1 package whole wheat noodles, or rice noodles cooked according to package directions
Directions
In a medium bowl (or in the crock pot) combine diced tomatoes, tomato paste, onions, garlic, salt, oregano, basil, and parsley. Once combined, add chicken and stir in well until all of chicken is covered by sauce. Pour into crock pot. Place the remaining vegetables on top of chicken mixture, do not stir*, and put lid on crock pot. Cook on high for 3 -4 hours or until chicken is cooked through. The last 15 minutes stir in the vegetables. Serve on noodles, top with Parmesan cheese, and enjoy!
*If you stir in the vegetables they will be too soggy when chicken is cooked.

Monday, November 8, 2010

Crazy!

Today I am posting to say that things have been just a little crazy at my house lately. I've been sick, then my kids got sick. You know how it goes through one then the next and so on. I'm just now getting back to experimenting with recipes to share with you. I am so sorry that I've been absent a lot lately. I posted the Fun Food Find that I promised I would post. Sorry for the lateness of that too. Hopefully by tomorrow I'll have another food/recipe for you. There are bunches and bunches of recipes I can't wait to start experimenting with. So until then, Happy Healthier Eating!!

Friday, November 5, 2010

Fun Food Find Friday!!

Our Fun Find for today is the Carob powder that I've started using, Chatfield's all natural Carob Powder. I really like the flavor of this carob powder. It really is the best tasting I've tried so far. I used it in so many different recipes. I love it in Carob brownies, and so do my kids. :]
I've only seen it at Good Earth, but I haven't checked if it's at the other health food stores yet.

Tuesday, November 2, 2010

Spaghetti Squash Spaghetti

One night we came home late. I was in a rush for dinner and didn't have that much time to make anything, so I thought. I looked in the fridge and saw the spaghetti squash that I had cooked the day before. I wasn't sure what to do with it and then I thought, Spaghetti sauce is really quick and easy to make. I put them together in less than 30 minutes! I was surprised that I hadn't thought of this earlier. It was so delicious! The spaghetti squash made the sauce just a little sweeter than normal, which was like candy to me. My children loved it, so now it is on the love list. Hope you enjoy it too!
Spaghetti Squash Spaghetti
Ingredients
1 medium or small spaghetti squash cooked and taken out of shell
3 8oz. cans tomato sauce, with salt
1/4 tablespoon dried basil leaves
1/2 tablespoon dried parsley flakes
3/4 tablespoon dried onion flakes
1/2 teaspoon dried oregano leaves
1/4 teaspoon garlic powder
1/2 teaspoon salt
1 1/2 tablespoons evaporated cane juice
Directions
In a medium saucepan add all of the ingredients except for the squash. Bring to a boil. Reduce heat to a simmer and cover, stirring occasionally. Simmer for at least 10 minutes. The longer you simmer the thicker the sauce becomes. Serve over cooked spaghetti squash, top with medium Cheddar or Parmesan cheese. Enjoy!

Monday, November 1, 2010

Carob Pudding Pie

On this first day of November I thought I would share with you a pie recipe. It's never too early to start getting your recipes ready for Thanksgiving! I loved this carob pudding pie! It was a huge hit at Canadian Thanksgiving last month. My one son was worried that there wasn't going to be any leftovers to take home so he piled a second plate really high just for him to take home. This is a gluten free pie, and you wouldn't know it by eating it. The carob powder is the best that I've come across. It has a really nice flavor to it. I'll share what brand it is with you on Friday. Happy November Baking, or non baking too! :]
Carob Pudding Pie
Ingredients
1/2 teaspoon salt
2/3 cup evaporated cane juice
1/4 carob powder
4 tablespoons cornstarch
2 1/4 cup rice milk
1 teaspoon vanilla
Directions
Mix together salt, evaporated cane juice, and carob powder in a pot on stove top. Turn heat to medium. Gradually add 2 cups of the rice milk stirring until everything is dissolved. While you are waiting for that to come to a boil, mix 1/4 cup rice milk with the cornstarch until completely dissolved. When the carob mixture starts to boil add rice milk to mixture and whisk continually. Once it comes back to a boil, boil for one minute. Then remove and add vanilla. Let cool a little before adding to pie crust. Then add and place in fridge until completely cool. Serve cool with whip cream.
Gluten Free Graham Cracker Crust
Ingredients
1 1/2 cup gluten free graham crackers, crushed
1/4 cup evaporated cane juice
2 tablespoons butter, melted
Directions
In a bowl combine graham crackers and cane juice. Transfer to a 9 inch pie pan. Add butter and mix well. Use the back of a spoon to smash crust evenly on the bottom and slightly up the sides of the pie pan. You might need to get your spoon a little wet to help smooth it out. Fill with carob pudding and put in fridge until ready to eat!

Friday, October 29, 2010

Fun Food Find Friday!!

Our Fun Food Find for today is Hansen's Natural Cane Soda. I know I've said this before but, I'm not a big soda fan. We don't really drink it in our home. But there are some occasions that we do have it. One of those is when we go camping. While growing up we always had lots of drinks when we went camping. It's fun to have lots of different drinks and juices besides water. So when I found these I was excited to be able to do that for my kids too! They don't have caffeine. The sugar they use it cane sugar. I'm not quite sure what stage of the sugar that is. But I like that they only have a few ingredients. My kids really like these. I think they have great flavor when they're flat, but I've always liked my pop to be a little flat without so much fizz. :]
You can buys these at the health food stores and at Costco.

Just a side note:
Tomorrow is when I'm going to take my kids trick-or-treating. I always have people ask me what I do about all of the sugar. So I'd thought I would share what I do with you.
I have a Halloween store. I buy toys and little things that I know my kids want. I even let them pick out some of the stuff. If it's a big toy, like one Santa would bring, then that is all they get. If it's a smaller toy they might be able to get more than one. So when they get home from trick-or-treating they use their candy as money to buy things out of my store. I let them also trade me for treats that I've shared with you on Fun Food Fridays, but only a few here and there.
So there you have it, that is what we do with all of the sugar. If we get home early enough I give out my kids candy (after they give it to me for their toys) to other trick-or-treaters that come by.

Wednesday, October 27, 2010

Wisdom Wednesday!!

I'm sick, so the Wisdom for today is...
When You're sick, drink lots of liquids and get lots and lots and LOTS of rest. :]

Tuesday, October 26, 2010

Chicken Chili

Now that the weather is getting colder, I thought I'd start cooking some of the delicious soups, stews, and chili's that are out there. When I looked online for a good chicken chili recipe, there were tons. But there wasn't one that I thought sounded good just as is or with a few changes. So I took what I had read and pieced a few together with some of my changes and this is what happened. If I must say so, this is the best chicken chili I've ever tasted! I'm not a huge hot spice fan, and this isn't the hottest, but it did have some heat to it. Just enough to make it a chili and to clean your pallet, but not so much that you couldn't finish you bowl. It is a wonderfully warming chili. Serve it with my Corn Bread found here.
Chicken Chili
Ingredients
2 boneless skinless chicken breasts, cut into chunks
1 tablespoon butter
1 yellow onion, diced
3 cloves garlic, minced
1 15oz can black beans, drained
1 14oz can great Northern beans, drained
2 14oz cans diced tomatoes with green chiles
1 14oz can chicken broth
1/4 cup organic brown sugar
2 tablespoons white vinegar
1 tablespoon chili powder
2 tablespoon ground cumin
1/2 tablespoon dried cilantro
dash of salt
1 green bell pepper, diced
1 red bell pepper, diced
Directions
In a large sauce pan cook the chicken in butter for about 5 minutes, then add onion, garlic, and peppers. Cook until chicken is no longer pink in center. Transfer to a large pot on stove top. Add the black beans, northern beans, tomatoes, chicken broth, brown sugar, vinegar, chili powder, cumin, cilantro, and salt. Stir well. Cook on medium heat for 30 to 40 minutes. Serve and enjoy!

Monday, October 25, 2010

Stuffed Tomatoes

I had to give you two pictures with this recipe. With the cheese on top you just couldn't see all of the goodness from the stuffing. This was heavenly! My son who does not like tomatoes even ate it. The slight spice from the turkey sausage pared with the sweetness from the tomato is delightful and very filling. Most people would serve this as a side, but I would suggest that this could be the main attraction. It has plenty of heartiness with the sausage. Your family or guests will love it!

Stuffed Tomatoes
Ingredients
6 large ripe tomatoes
1 cup crushed Gluten Free crackers (I use these)
2/3 cup shredded cheddar cheese
1 small onion, diced
2 teaspoons garlic, minced
2 teaspoons butter
1 4oz. can diced green chilies
1 recipe turkey sausage, see below

Directions
Preheat oven to 400*F. Cut the tops off of the tomatoes and use a knife to cut around the inside, separating the flesh from the skin. Scoop out the flesh and set aside to use for later. Place the tomatoes in a small baking dish. In a sauce pan, saute onion and garlic in butter until tender. Add flesh from the tomatoes, crackers, sausage, and green chilies; mix well. In the bottom of each tomato put a little cheese. Then fill with sausage mixture. Bake in oven for 10 minutes. Remove and top with remaining cheese and return to oven to bake for another 5 minutes or until cheese is melted. Serve and enjoy!
Original recipe found here.


Turkey Sausage

Ingredients
1/2 pound ground turkey
1 1/2 teaspoon liquid smoke
1 1/4 teaspoon minced garlic
3/4 teaspoon evaporated cane juice
1/4 teaspoon salt
3/4 teaspoon dried oregano leaves
1/2 teaspoon ground cumin
3/4 teaspoon onion powder

Directions
In a bowl combine all ingredients well. In a sauce pan cook turkey sausage on medium high heat until cooked through; continually stirring to break up turkey so that it resembles cooked hamburger.

Friday, October 22, 2010

Fun Food Find Friday!!

Our Fun Find today is Brown Rice Tortillas. I love these!! They taste just like white flour tortillas but they are much better for you. They are wheat and gluten free. These are what I have use in my recipes when it calls for tortillas. Try them I'm sure you'll like them.
I get these at the health food stores in the freezer section.

Thursday, October 21, 2010

Apple Bars

Really when you say, bars, it really means dense and moist. These are a little more cake like, but I'm still going to call them bars. They are very sweet and a perfect fall treat. They are nice because they are made with less gluten flour for those of you who are gluten intolerant. And you don't have to sacrifice any flavor either. Oh and don't tell anyone, they are fat free too!
Apple Bars
Ingredients
1 1/2 cup LG flour mix
3 1/8 teaspoon baking powder
1/4 heaping teaspoon salt
1/4 teaspoon xantham gum
1/4 teaspoon cinnamon
4 tablespoons applesauce
1/4 cup organic brown sugar
1/2 cup evaporated cane juice
2 cups apples, chopped into small pieces
1 egg
1 teaspoon vanilla extract
2 tablespoons evaporated cane juice
3 teaspoons cinnamon
1/4 cup organic powdered sugar
Directions
Preheat oven to 350*F. Grease a 9x13 inch pan. Sift together flour, baking powder, salt, 1/4 teaspoon cinnamon, and xantham gum. Set aside. In a large bowl mix together organic brown sugar, 1/2 cup evaporated cane juice, and applesauce until smooth. Stir in egg and vanilla. Then add the flour mixture. With a hand blender add the apples and blend for 2 minutes. Mixture will be thick. It will thin out as you blend the apples. Spread the mixture evenly into prepared pan. Mix the remaining cinnamon and evaporated cane juice and sprinkle over mixture. Bake for 25-30 minutes or until bars spring back when lightly touched. Cool in pan. Cut into squares and dust with organic powdered sugar.
Original recipe found here.

Wednesday, October 20, 2010

Wisdom Wednesday!!

Vitamin A
When you think of Vitamin A, do you think about your eyes? Well most people do and that's because your retina in your eyes need vitamin A to be healthy, to see color. But there are other things that your body needs vitamin A for. You need it for bone growth, healthy skin, cell division, reproduction, and cell differentiation (that's when a cell becomes part of the brain, lungs, or other specific tissue in your body). Vitamin A helps strengthen your immune system. It helps make white blood cells. It helps strengthen the lining in your urinary, intestinal, and respiratory tracts. If these are not healthy then it becomes easier for bacteria to grow in your body.
There are two forms of vitamin A and you get them from two different sources, plants and animals. Most people get it from plants, fruits and vegetables. Some of the foods that are rich in vitamin A include:
Liver
Sweet Potatoes
Carrots
Mangoes
Dried Apricots
Cantaloupe
Spinach
Kale
Peas
Tomatoes
Papayas
Milk
Egg Yolks
Mozzarella Cheese
Beef
Chicken
The good thing about Vitamin A is that if you have a deficiency it is easy to recover from it. You simply have to eat more of these foods. So Happy Healthy Eating!
Sources:

Tuesday, October 19, 2010

Peach Crisp

This year I put up 1 and a half bushels of peaches. I also made some delicious peach leather. Then I thought what else can I do with these peaches? I love peach cobbler, but I didn't want to get my dutch ovens out. So I found this recipe for a peach crisp. I loved that it didn't have hardly any fat in it, so easy to make changes to. It turned out wonderful! I even took some to a baby blessing and they loved it. I especially like that the crust is a little thicker. I'm one of those people that like the cake part. What a yummy fall treat with peaches!
Peach Crisp
Ingredients
4 cups sliced and peeled fresh peaches
1/2 cup orange juice
2 tablespoons organic brown sugar
2/3 cup evaporated cane juice
2 teaspoons baking powder
1/4 teaspoon xantham gum
2 eggs
2 tablespoons melted butter
3 teaspoons evaporated cane juice
1/4 teaspoon ground cinnamon
Directions
Preheat oven to 350*F. Spray an 8 inch square baking dish with non stick cooking spray. In a bowl, combine the peaches, orange juice, organic brown sugar and 1/2 teaspoon cinnamon. Transfer to prepared dish. Combine the flour, evaporated cane juice, baking powder, and xantham gum. Add eggs and butter and mix until crumbly. Sprinkle over peaches. Combine the 3 teaspoons of evaporated cane juice and the 1/4 teaspoon cinnamon; sprinkle over crumb mixture. Bake for 55 minutes or until filling is bubbly and topping is golden brown. Serve warm.

Monday, October 18, 2010

Two-Bean Tamale Pie

MIA
Sorry I was MIA last week. It was a crazy week to say the least. I'll spare you the details, just know that I'm back and I have some wonderful recipes to share with you. :]
Lately I've been looking for more recipes that are vegetarian. Not that I have anything against meat, I don't. I been wondering how they do it. I know there are a lot of yummy dishes that people make and even some that I've made without thinking, 'let's make a vegetarian dish tonight'. When I came across this recipe I thought it sounded really good, it seemed pretty easy to make, and there were lots of changes I could make to it to make it even more healthy. I've made it a few times. The picture above is from the first time I made it. It was okay but I made it better and forgot to take a picture of the better version. The version I'm sharing with you today. I loved it! It was amazing how filling it was. The slight spiciness of the beans went perfectly together with the sweetness of the corn bread. It just hit the spot. And to top it all off, this is another wonderful gluten free dish!
Two-Bean Tamale Pie
Ingredients
1 medium red sweet pepper, chopped
1 small onion, chopped
2 1/2 teaspoons garlic, minced
2 teaspoons butter
1 can black beans, drained, rinsed, and slightly mashed
1 can pinto beans, drained, rinsed, and slightly mashed
1 4 oz can diced green Chile peppers
1 can diced tomatoes with garlic and onion
1/2 teaspoon chili powder
1 teaspoon ground cumin
Topping
1 cup corn flour
1/2 cup corn meal
1/2 cup evaporated can juice
1/2 tablespoon baking powder
1/4 teaspoon salt
1 cup rice milk
2 eggs
2 tablespoons applesauce
Directions
Preheat oven to 400*F. Grease a *deep 2-quart baking dish and set aside. In a medium skillet cook sweet pepper, onion and garlic in butter until tender. Stir in pinto and black beans, chili powder, cumin, diced tomatoes, and green chiles; heat through. Spoon mixture into the prepared dish.
In a medium bowl combine corn flour, corn meal, evaporated cane juice, baking powder, and salt and set aside. In another bowl combine rice milk, eggs, and applesauce. Add dry mixture to wet mixture and combine well. Pour corn bread mixture on top of bean mixture. Bake, uncovered, for 25 minutes or until golden brown and a toothpick inserted in the center of the corn bread comes out clean. Can serve with salsa and sour cream.
*If you do not use a deep baking dish the corn bread will raise and fall over the side of the dish while baking. I like to use my corning ware deep dish.

Friday, October 15, 2010

Fun Food Find Friday!!

Our Fun Food Find for today is Rice Lasagna noodles by De Boles. These are gluten free and have a very yummy flavor. My family doesn't even notice when I use these instead of whole wheat.
You can find these at the health food stores.

Monday, October 11, 2010

Crock pot Chicken Enchiladas

It's fall now, so you can use your oven with no problem. But I still get busy and sometimes I need to make dinner when my kids are at school so I can get stuff done with them when they get home. I love chicken enchiladas. So when I saw this recipe I was more than excited to try it out. And I love how it turned out. It really does have all of the wonderful flavors of my 'cook in the oven' green Chile Enchiladas. The only differences are, there is no rice, it doesn't take as long to put together, and it is a little soupy. These are so delicious, you need to try them I promise you if you like green Chile enchiladas, you'll love them!
Crock pot Chicken Enchiladas
Ingredients
1 can chopped green chile's
1 can condensed cream of chicken soup
1 can green enchilada sauce
1 can black beans, drained
6 gluten free tortillas, or whole wheat, cut into 3/4 inch strips
2 boneless skinless chicken breast, cubed into small pieces
2 cups shredded Cheddar cheese
2 large tomatoes, chopped
2 cups chopped lettuce
1/2 cup fat free sour cream
Directions
Spray a 3 to 4 quart slow cooker/crock pot with cooking spray. In cooker, spread 1/2 of the green chile's and 1/4 of the enchilada sauce to cover the bottom. Spread 1/3 of the chicken over the sauce. In a medium bowl, mix remaining chiles and enchilada sauce with the soup. Arrange 1/3 of the tortilla strips over the chicken in the cooker. Top with more chicken, 1/2 cup of the beans, and 1 cup of the sauce, spreading to the edges of the cooker to completely cover the tortilla strips. Repeat layers twice. Cover and cook on high for 4 to 5 hours or until the chicken is no long pink in the center. Top with cheese. Cover and cook about 5 minutes longer or until cheese is melted. Serve with tomatoes, lettuce, and sour cream.

Friday, October 8, 2010

Fun Food Find Friday!!

Today the Fun Food Find is a cereal, EnviroKids Organic Amazon Frosted Flakes. They are gluten free and oh so yummy! My kids loved them. And the best part is they don't have that many ingrediants. So they are much healthier for you than the normal frosted flakes. I think that they tastes better too.
You can find these at the Health Food stores and on line.

Thursday, October 7, 2010

Orange Baked Acorn Squash

A few Sundays ago I wasn't feeling very well. My husband was home and decided that he was going to experiment for me. He found this recipe and then asked me what changes I would make to it if I were going to cook it. He made this amazing Orange Baked Acorn Squash. I had never had Acorn Squash before. I had no idea how it tasted. Well let me tell you, this way is delicious! I love how the orange mixes with the apple to give the squash a nice sweet taste. I would never have thought to put those two flavors together but they work. And they work well! I had some of my family try this. Those who liked squash loved it, those who don't care that much for squash loved it. If you have never tried an Acorn Squash and want to, use this recipe!
Orange Baked Acorn Squash
Ingredients
1 acorn squash, halved and de-seeded
1/4 cup frozen orange juice concentrate, thawed but not diluted
1 tablespoon butter, melted
2 teaspoons organic brown sugar
1 apple, peeled de-seeded and cut in half
Directions
Preheat oven to 350*F. Fill a 2 qt. baking dish with 1/2 inch of water. Place squash halves cut side down in the dish, and bake for 35 minutes in the preheated oven. In a bowl, whisk together the orange juice, butter, and organic brown sugar. Remove squash from oven. Turn squash halves cut side up in the baking dish. Drizzle a little of the orange mixture in the middle of the squash. Place half of the apple in each of the squash and drizzle the remaining orange mixture over the squash, making sure to drizzle on the sides too. Return to oven and continue baking for 25 minutes. Serve warm and enjoy!!